How to Set Up Auto Pay
Learn step-by-step how to easily set up auto pay for your bills, ensuring timely payments and avoiding late fees.
Table of Contents
Overview
Auto Pay allows invoices to be automatically charged to a customer’s stored payment method based on a selected invoice date.
Before enabling Auto Pay, a valid payment method must be stored on file for the customer.
If you need help storing a payment method, refer to:
Customers can also store payment methods themselves through:
- The Customer Portal
- The payment page when paying an invoice
- An invitation sent to store a payment method
If Auto Pay is scheduled to run on or before your New Invoice reminder is sent, the invoice will be automatically charged and the New Invoice notification will not be delivered. Once the payment is successfully processed and funded, the customer will receive a Paid Invoice notification instead.
Auto Pay applies to all future invoices once enabled, as well as any outstanding invoices that are updated.
How To Enable Auto Pay
Step 1
Log in to your Biller Genie account.
Navigate to:
Customers > Select Customer

Click on the Customer ID or Display Name to open the customer profile.
Step 2
Click the Auto Pay tab.
Select Edit.

Step 3
Toggle Auto Pay Invoices from Off to On.
Select your desired Payment Method.
Click Update Customer to save your changes.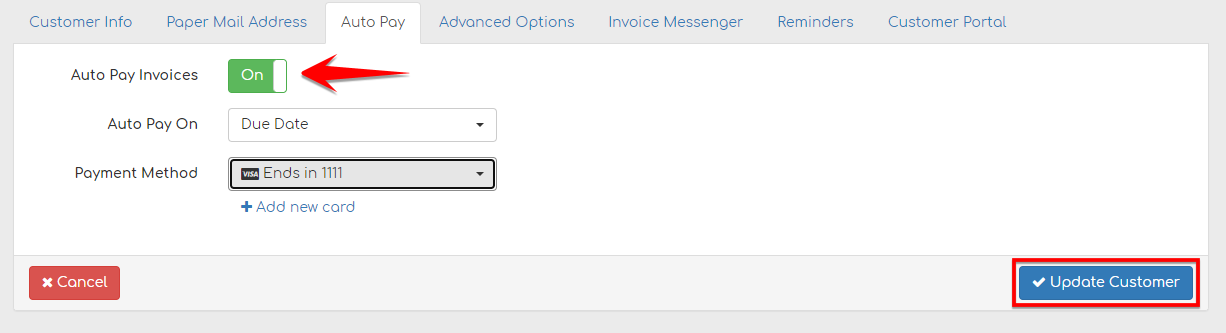
Step 4
Select the Auto Pay trigger date.
By default, Auto Pay is set to the Create Date of the invoice. You may change this to:
- Invoice Date
- Due Date
Choose the option that best fits the customer’s preference.
How Auto Pay Timing Works
If Auto Pay is set to Invoice Date or Due Date and that date is in the future:
- The customer will receive the standard New Invoice notification when the invoice is created.
- If the customer does not manually pay before the selected trigger date, the invoice will automatically be charged based on the chosen Auto Pay configuration
If Auto Pay is set to run on the same day or before your Invoice Messenger is scheduled to send the New Invoice reminder:
- Auto Pay will process the payment automatically.
- The New Invoice notification will not be sent.
- Once the payment is successfully processed and funded, the customer will receive a Paid Invoice notification instead.
Important Notes
- A stored payment method is required for Auto Pay to function.
- Auto Pay applies to future invoices once enabled or outstanding invoices that are updated.
- Customers may still manually pay an invoice before the Auto Pay date.
Still Having Trouble?
If Auto Pay is not triggering as expected, contact the Biller Genie support team at support@billergenie.com and include the following details:
- Customer name
- Selected Auto Pay trigger date
- Payment method on file
- Invoice number in question
- Any error messages displayed
Providing this information will help our support team assist you as efficiently as possible.