Customer & Invoice Import Playbook
Table of Contents
Customer Import Tool
The Biller Genie customer import tool can allow you to import large volumes of customers from another source, such as Outlook, Gmail, or excel.
Important things to know before importing customers into Biller Genie
- The file size is limited to 1000 rows, so if you need to import a customer list that is larger, you will need to split it up into multiple imports.
- Sub-accounts or sub-customers cannot be imported into Biller Genie. Because of this, all customers will be imported as parent customer accounts.
- Duplication of customers can occur. The import tool will not overwrite any customers that already exist in Biller Genie and will not recognize if a record already exists. If a file is imported incorrectly and needs to be re-imported, you will need to delete imported customers from the file or edit each one individually in Biller Genie.
- The column headers on the provided CSV template must be used.

- When importing contacts from a spreadsheet (including files exported from Excel, and as a CSV) ensure that:
- The file is CSV file type (any other file type will not be supported)
- Column headers are in the first row.
- Contacts are on Sheet 1 of the spreadsheet.
- The spreadsheet doesn't have any formulas or charts.
The spreadsheet doesn't have any errors, such as #REF!, #NAME?, #N/A or #VALUE!.
To import a spreadsheet into Biller Genie, it will need to be formatted correctly.
Step 1
Download the Biller Genie CSV Customer Template from the customer import tool.
Step 2
Make sure that Sheet 1 (tab 1) of the spreadsheet is being used.
Step 3
Make sure that row 1 of your spreadsheet is not modified in any way. The column headers provided must be used for a successful import.
Step 4
Fill in your spreadsheet with your contacts' information. It's okay to leave any information that you don't have blank.
Note: The FirstName, LastName, and Active fields (Y or N) are required. If any are blank, the customer on that line in the CSV file will be skipped during the import. (See Customer Field Descriptions and Restrictions)
Step 5
If you're using Excel, save the spreadsheet as a CSV file and note where you save it. XLS and XLSX files are not supported.
Verify the CSV file
Before importing your contacts, it's important to review the information and make sure everything looks correct. If the import has any mistakes, it can be a lengthy process to manually correct or remove your imported contacts
Step 1
Open the CSV file you saved and check it for accuracy.
Step 2
Double-check that your spreadsheet column titles in row 1 match the sample spreadsheet.
Step 3
Check the contacts, fill in any missing information, and correct any mistakes.
Step 4
Make sure the file doesn't exceed the 1000-row limit. If it does, split it into multiple import files.
Import your contacts
Now that the spreadsheet is accurate, it is time to import your contacts into Biller Genie.
Step 1
Sign in to Biller Genie.
Step 2
Click Customers in the left side menu. Then click Import Customers in the upper right.
Step 3
Click Choose File to upload the file from your computer. Choose the file, and then select Open.
Step 4
Click Upload file.
Step 5
A last-chance warning dialog box will pop up. Click Proceed.
Step 6
The results dialog box will pop up displaying the outcome of the import.
- The number of successfully imported and/or skipped customers are listed.
- Skipped customers will have the corresponding CSV row number +1 and the skip reason.
Step 7
Click Ok.
Step 8
You can now view your imported contacts inside Biller Genie and make any needed updates.
Step 9
Repeat steps 1 – 8 if multiple imports are needed.
Customer Field Descriptions and Restrictions
| Import Field Name | Required? | Notes |
| Business Name | No | Special characters such as: or – are allowed |
| First Name | Yes | Only add the first name to this column. Special characters such as: or – are allowed. |
| Last Name | Yes | Only add the last name to this column. Special characters such as: or – are allowed. |
| Job Name | Yes | Special characters such asdouble-check: or – are allowed. |
| Phone Number | No | No formatting restrictions. |
| No | Cannot contain spaces, and must contain an at sign (@) and a period. Example: your_name@company.com. | |
| CC Email | No | Cannot contain spaces, and must contain an at sign (@) and a period. Example: your_name@company.com. |
| Other | No | This field is used for a customer ID external to Biller Genie. |
| Active | Yes | Must be ‘Y’ or ‘N’ Y = Active N = Inactive |
| Address | No | Used for street address. |
| City | No | The city of the customer. |
| State | No | The state of the customer. |
| Zip | No | The zip code of the customer. |
Invoice Import Tool
The Biller Genie Invoice Import tool allows you to import multiple invoices at the same time.
Before you start:
- You can import a maximum of 1,000 rows per spreadsheet.
- Invoices must be associated with customers that already exist in Biller Genie.
- You can import invoices with single or multiple line items.
- You can’t add discounts, credit memos, or negative amounts in general.
Important:
Invoice numbers can be duplicated if they already exist in Biller Genie, so make sure to double check that they do not already exist.
Prepare your spreadsheet
You can create your own spreadsheet or download a sample file found in the invoice import tool. To get the sample file, go to “Invoices” and click “Import Invoices”. Then click the Click here to download the template.
Your spreadsheet should be in .csv format and have the following columns:
- CustomerId (How to Find)
- InvoiceNo
- InvoiceDate
- DueDate
- TaxRate
- ItemName
- ItemDescription
- ItemRate
- ItemQuantity
- ItemAmount
- Taxable (Y or N)
Important:
If your spreadsheet has new products or services(items), be sure to add them in Biller Genie before importing. If the new products or services (items) are not added to Biller Genie before the invoice import, “Sales” will be used as the item name and description.
Verify the CSV file
Before importing your invoices, it's important to review the information and make sure everything looks correct. If the import has any mistakes, it can be a lengthy process to manually correct or remove imported invoices.
Step 1
Open the CSV file you saved and check it for accuracy.
Step 2
Double-check that your spreadsheet column titles in row 1 match the sample CSV template.
Step 3
Check the invoices, fill in any missing information, and correct any mistakes.
- Ensure that required fields have data to prevent invoices from being skipped.
Step 4
Make sure the file doesn't exceed the 1000-row limit. If it does, split it into multiple import files.
Import your CSV file
Step 1
Sign in to Biller Genie.
Step2
Go to Invoices and click Import Invoices in the upper right.
Step 3
Click Choose File to upload the file from your computer. Choose the file, and then select Open.
Step 4
Click Upload file.
Step 5
A last-chance warning dialog box will pop up. Click Proceed.
Step 6
The results dialog box will pop up displaying the outcome of the import.
- The number of successfully imported and/or skipped invoices are listed.
- Skipped invoices will have the corresponding CSV row number +1 and the skip reason.
Step 7
Click Ok.
Step 8
You can now view your imported invoices inside Biller Genie and make any needed updates.
Step 9
Repeat steps 1 – 8 if multiple imports are needed.
Invoice Field Descriptions and Restrictions
| Import Field Name | Required? | Notes |
| Customer ID | Yes | Must correspond with a customer ID that exists in Biller Genie |
| Invoice Number | Yes | Special characters such as":" or "–" are allowed. If an invoice number already exists in Biller Genie, it can be used more than once. |
| Invoice Date | Yes | Date format MM/DD/YYYY |
| Due Date | Yes | Date format MM/DD/YYYY |
| Tax Rate | No | If left blank, a 0.00 tax rate will be used. -Numerical values only. -The tax rate field is not related to the taxable field in the CSV file. If there is a tax rate greater than zero, the line item will be taxed regardless of the taxability. |
| Item Name | No | Item name should match the corresponding item name in Biller Genie exactly. -If an item name that does not exist in Biller Genie is used, “Sales” will be used as a default. -If left blank, “Sales” will be used as a default. |
| Item Description | No | If the item name used has a match in Biller Genie, the description of the matched item will be used. - If an item name that does not exist in Biller Genie is used, “Sales” will be used as a default. -If left blank “Sales” will be used as a default. |
| Item Rate | Yes | -Numerical values only. Special characters like "$" or others are not allowed. -Item rate can be different from the corresponding item in Biller Genie but will not change the item default rate. |
| Item Quantity | Yes | Numerical values only. Special characters like "$" or others are not allowed. |
| Item Amount | Yes | Numerical values only. Special characters like "$" or others are not allowed. -The item MUST match the item rate X item quantity (do not include tax). |
| Taxable | No | If left blank and the item does not exist in Biller Genie, default Y (taxable) will be used. -If the item exists in Biller Genie, the default taxable status will be used. -If in the CSV file N is the taxable value and there is a tax rate greater than zero, the item will be imported as taxed. |
How to find the Customer ID in Biller Genie
When importing invoices into Biller Genie, the Customer ID field is required in the CSV file to link the invoice to the customers that have already been imported.
Step 1
Log into the Biller Genie Merchant Portal.
Step 2
Click “Customers” on the left side menu.
Step 3
The Customer ID will be the first column on the left in the customer list.
- To view all customers at once, click the record drop-down at the bottom of the screen and select “All”.
- Search for customers by using the search field at the top of the customer list.
Step 4
The customer list can also be exported to CSV by clicking the “Export to CSV” button in the upper right corner.
Managing Items
This guide will show how to add Items in Biller Genie.
Step 1
After logging into the Biller Genie merchant portal, click "Items" on the left-side menu.
Step 2
In the upper right corner, click the blue + Add New Item button.
Step 3
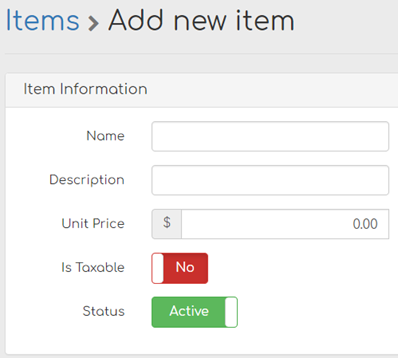
The Add New Item screen opens with the item information fields.
Step 4
After adding the item information, click the blue Save button in the bottom right corner.
Step 5
The new item will be saved and then displayed in the items list.
Field Restrictions & Settings:
Name: This field is required.
Description: Non-required field.
Unit Price: The default price for the item.
Taxable: The taxable setting is the default if the item is taxable or not. An item that is defaulted to be taxable can be changed to nontaxable on a line level inside a specific invoice.
Status: This is the active or inactive status toggle. If the status is set to inactive, the item will no longer be selectable when creating a new invoice in Biller Genie.